
I absolutely love the way caning looks on furniture it just gives the piece such a coastal feel and in some cases a modern look. Some of the ones I have seen cost way more than I want to spend on a piece of furniture. Which is why I love hunting for old pieces of furniture to give them new life. Out there today there are so many resources to find old furniture, at a rather inexpensive price. In fact, I’m sure there might be some furniture in your family that you could acquire and give new life. You’d be surprised what paint, and in this case, caning can do to a piece.
For me I was able to acquire a special piece. When it was time to clean out my grandmothers house, there was one particular piece that I always remembered, it was a small cabinet that sat right by her front door, she always had photos inside the piece and plants on top. When it came time to take pieces, I knew I wanted this particular piece.
Here it is in its original form. I’ve had this cabinet for about 8 years now, and its sat just like this for the whole time. I always knew I wanted to paint it, but also didn’t want to change its original look. After all that time, I knew now was the right time to give it new life, and boy am I glad I did!

The cabinet had 6 glass panels four in the front and one on each side, all of which were only held in by small screws, making it easy to remove them. In my opinion, the glass dated the cabinet and I knew I wanted to remove them. I am LOVING the fact that caning is coming back into style, its taking over everything, and I can’t get enough! I researched a local caning store, and researched the different sizes, at the end of this post I will add the links to two caning sites that I have found. I narrowed the size I wanted to use to the 7/16” hole to hole size.


Before I could start painting the pieces, I needed to address the water damage that had occurred all the years my grandmother watered her plants on top. The cabinet itself is made of veneer, so I needed to chip away the old veneer and sand down any that was left as well as the remaining glue.


In order to really get under some of the peeling veneer, I used a thin metal putty knife. It made it easy to get under certain parts and pop them off. Once all the veneer was chipped away and the excess parts sanded down, I went around the piece and located all the areas that needed to be filled with wood filler. On the top of the piece there was a huge gouge, which absolutely needed to be filled.


The wood filler starts off a bright pink, once it is completely dry it will be a more natural looking color. This is great as you are able to really get a sense of where you are putting the filler, and also when it is good to sand. You can see here how I filled that huge gouge that was in the top.

I also used the wood filler to fill the holes where the knobs once were, I knew that I wanted to give the doors a different look than the old knobs. Since the holes were not very large, or deep I was able to use the wood filler to patch them. If you have a cabinet that has very wide holes that are rather deep, you would be better off getting some wooden dowels from your local hardware store and filling the spaces with that, vs just the wood filler.

Once I had all the areas of the cabinet filled, I gave it time to dry (I let it sit overnight). Then I got to sanding the areas that I filled down. I didn’t go crazy with sanding down the entire piece as the primer paint I was using is made to adhere to very glossy pieces. I used my mouse sander, its so easy to use and really gets into all the tighter areas.


Now that the cabinet was patched and sanded down it was time to start painting. Since I didn’t heavily sand down this piece I knew I needed to use a strong primer for my base coat. I chose the Zinsser BIN Primer, it is a shellac primer and sticks to nearly any surface. It stinks, be warned! I’ve used it many times before, so I knew it would be the best for pairing on the glossy areas I didn’t sand down.


Above is a picture of the cabinet as I was painting it and after it was done. The primer goes on easy, and dries fairly quickly so you have to make sure you can dedicate the time to the piece you are wanting to paint, the brush will get gross if you let it sit too long.
Once that primer coat was completely dried, I painted the cabinet in a semi-gloss soft white. It likely could have used just one coat, but I went over it twice to make sure it had good coverage. I then just let that sit over night to really dry.
The next day is when I started to tackle the caning! Which to me was the most exciting part of the whole project, haha. I had never worked with caning before, but I had seen other friends tackle it and they gave me the confidence!
I had actually picked up my caning from a local place, and the woman was extremely helpful and a wealth of knowledge. She had recommended that I soak the caning anywhere from 30 mins to 4 hours. I had soaked mine for about 2hrs in the bathtub.
After it had been soaking, I had taken it out and stood it up in the sink for a minute, just to let it drip off. Then I just laid it out on our island to be able to easily work with it. The glass that I had taken out of the doors and side panels, I used as a template to trace out on the caning.


Now that I had the piece cut out, I used my electric staple gun (way better than a hand stapler) to secure the caning in place. Make sure that when you are stapling down each side that you are pulling it tight. Since the caning is wet, it will try tighter than it is when putting it on initially so you want to make sure its tight to start with.


I repeated this same process of cutting the caning for all 6 panels. To add the caning to the actual cabinet meant that I had to reach into the cabinet to staple it in. This was tough as it was a tight space, but having the electric stapler certainly helped!

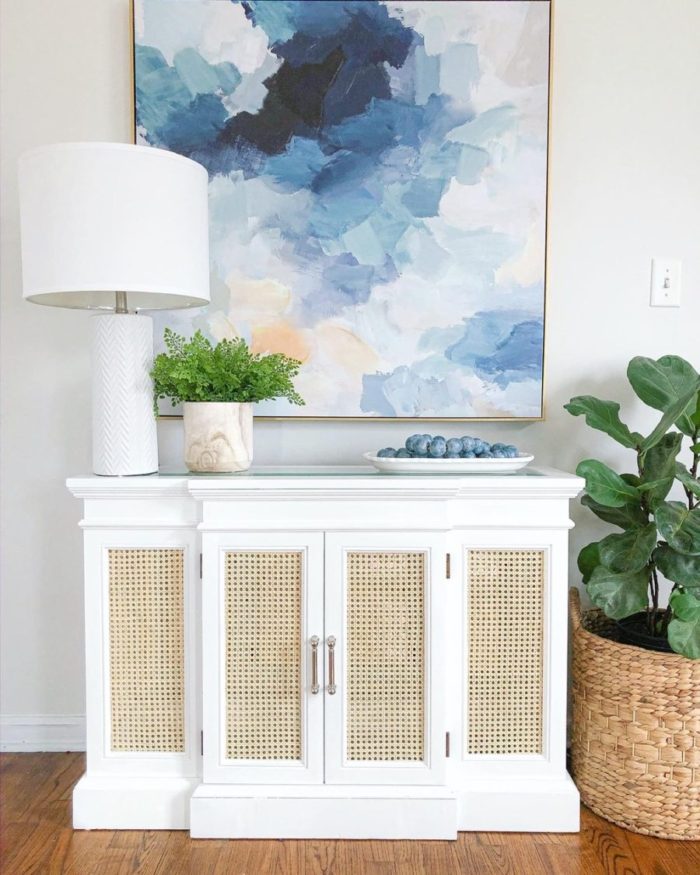
Once I had finished adding the caning to the rest of the front and sides the cabinet was done! Here is how it turned out, and I am so proud of the final outcome. I was able to give my grandmothers cabinet, which holds memories and sentimental value, new life. It now seamlessly fits in my home!

Thank you so much for checking out this post, if you have any questions please just leave them below. Also, here are the two sites where you can order caning from.
Www.franksupply.com and www.hhperkins.com
4
Gorgeous !!!
I love caning as well. Super job ❤️
Thank you so much! I am so happy you enjoyed reading it!