

I have been asked on numerous occasions what I thought were the must have tools for a someone new to DIY or to home ownership. I thought this was a great opportunity to round up my favorite tools that are our go to when we do any project.
You’ll notice that I have a lot of Ryobi tools in my list, this is by no means sponsored by Ryobi (although that would be great), however I have had these tools for years, they’ve held up through several major home additions and renovations and still going strong. Another huge perk is the ability to buy their “tool only” option, which keeps the cost down and allows you to use the batteries you have for each different tool.
I would highly recommend having at least 2 batteries on hand so that you can use multiple tools at once, or just to have a backup which is also important.

The first important tool to own if you are wanting to do any DIY projects at home is a saw. Here at home we actually have a 7 1/4″ saw as well as a 12″ saw, both are sliding compound miter saws. Having the sliding feature of the saw is important as you are able to cut boards that are wider in size.
When I am doing a project alone I always go for the 7 1/4″ saw, as it is small, light weight and typically any project I am tackling alone doesn’t have boards that are too large for this saw.
For the saws I have actually added a few links, one for the 7 1/4″, one for the 10″ and one for the 12″. If I were to buy these saws again, I might go for the 10″ as the price really isn’t too far off from that of the smaller saw, and as your skills developed you’d have the bigger saw to work with.

It was a hard decision as to which tool to put first in the list for this post. The saw and the drill are by far your most useful, as you can accomplish a lot with both. However, I would assume (maybe that’s wrong to do so) that most households have a drill just for basic maintenance of the home.
I’ve also included in this section a drill bit set, which to me is just as important as the drill. With different projects the need for pre-drilling holes may arise so that you don’t split the wood when drilling screws into them.
This particular drill bit set not only has bits for pre-drilling holes, but also many other bits that can be used for drilling into wood, metal and plastic. For the cost, this one is a must buy!
The drill linked is also a great one, it is an 18V which is what you want when purchasing a drill, one with power for those tougher projects.
It also includes two batteries, which is ideal as depending on the length of the project, batteries can run out. There is nothing worse than being in the middle of a project and the battery dying on your tool.
As I mentioned earlier all Ryobi tools use the same battery for multiple tools, so when doing one project you can have the drill and maybe the nail gun going at the same time.

For any project that includes work with decorative moldings, widow trim baseboard trim, chair rails or any detail work you’ll want to invest in one of these.
The difference between the two is really in the thickness of the nails, brad nails are typically thinner (higher gauge number ~ 18) than finish nails (lower gauge number ~15-16).
When choosing which to purchase you really want to consider the type of projects you are looking to complete. If most of the work you’ll be doing works with lighter boards that don’t require much holding strength then the brad nailer would be a great option. Typically, this used for putting up paneling that is lighter and smaller trim pieces.
The other benefit of the brad nailer is it can hold slightly smaller length nails, it can go down to 1/2″, where as the shortest finish nail is 1″.
The finish nailer is one that can be used for bigger trim work, like crown molding, chair molding or baseboards.
I actually only own a finish nailer, but have wished at times I had a brad nailer, as I needed something that could work with shorter nails.

The table saw might be a little more advance for some, but it is definitely a tool we use regularly. Having the ability at home to rip down a board is so nice to have. By “rip down” I mean, to cut it down length wise. So taking a 5″ wide board, and cutting to down to say 3″ wide. Whatever your project may call for.
When we installed our shiplap ceilings we took a 4×8 sheet of luan board and ripped it down to 5.75″ strips. Having the ability to do that at home and not rely on the big stores to do it for me and accurately is such a nice thing.
We truly use it for EVERYTHING. If there is one tool that is something to add to maybe a wish list down the road, once maybe you become more comfortable with DIY, this should definitely be it.

The jig saw is such a versatile tool, that we have used many times, for all different projects. We used it most recently when we built my sons window seat and had to cut a space out for the plug that was in the wall.
Actually, we not only used the jig saw but pieces that are in the drill bit set I mentioned above. We also used the jig saw when we built our custom vent hood cover, it was used the cut the shape of the hood.
The versatility of this little tool is endless, you can use it to build something small like a bird house or use it to build yourself a headboard for a bed.
I would say that for this particular tool I would make sure to get the corded saw, because the battery might get drained a lot faster than a drill would if you are cutting long lengths or lots of cuts. So having the comfort of never losing power is good.

As you all know, the sander is quite possibly my most used tool when I do my refinishing projects. I love both my mouse and my orbital sander, and would highly suggest both if you are thinking to tackle any kind of project like that.
The two sanders that I have are both from Walmart, and they both have held up great! I clearly have put them to the test over several projects and they are going strong.
I would also highly recommend getting extra sanding pads for both of these sanders. Here are the orbital sanding pads set I’ve purchased and and the mouse sanding pads set.
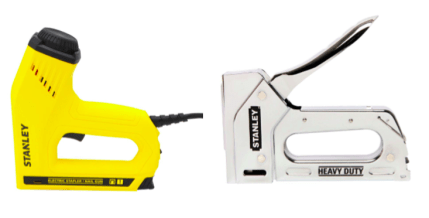
These may seem like basic tools, and not truly much need for them, but I go for these often. The hand stapler is good for areas that are difficult to get to. The electric hand stapler is nice because if you are stapling in a bunch of staples, using the handheld can be a lot and eventually hurt your hand.
I have used both to install the runner on our stair case, I used it to put the caning on the white cabinet I recently redid and I used it to staple the fabric to the bench on both my window seats.
I also reach for the electric stapler when I need small/short nails. As it is not only a stapler but also a brad nailer, but for shorter brads, this uses up to 5/8″ in length. Love that it has dual function!

I probably should have put this at the top of the post, because you really shouldn’t be doing any project without a level around! We use both our 24″ Level and our 48″ Level all the time!
These are so important to have around, both sizes are important as depending on what you are building or hanging you really want to check to make sure its level. You’ll often see our red on in pictures when we are building something!

I added this to the bottom of this post because I feel most already have these tools, but if not this set really has all the basic tools one would need around the house or to start out on their DIY adventures!
That’s all for now! If I think of other tools I will be sure to come back and add it to this post, so make sure you subscribe to get the updates! But for the most part, these are my go to tools for all our projects!
Good luck on all your projects and leave a comment if you need anything!
xo, Ashley
2
Saving this one for a wishlist!! I have a few but need more for bigger, more involved projects!!!
Yes! Always good to keep a watch on them too because they run sales all the time, especially close to Christmas! Thank you Cass!
Great post! Thanks for sharing it! This is what I need, tools guide for beginners 🙂
I am so glad you like it! I hope you use it and find it helpful!