

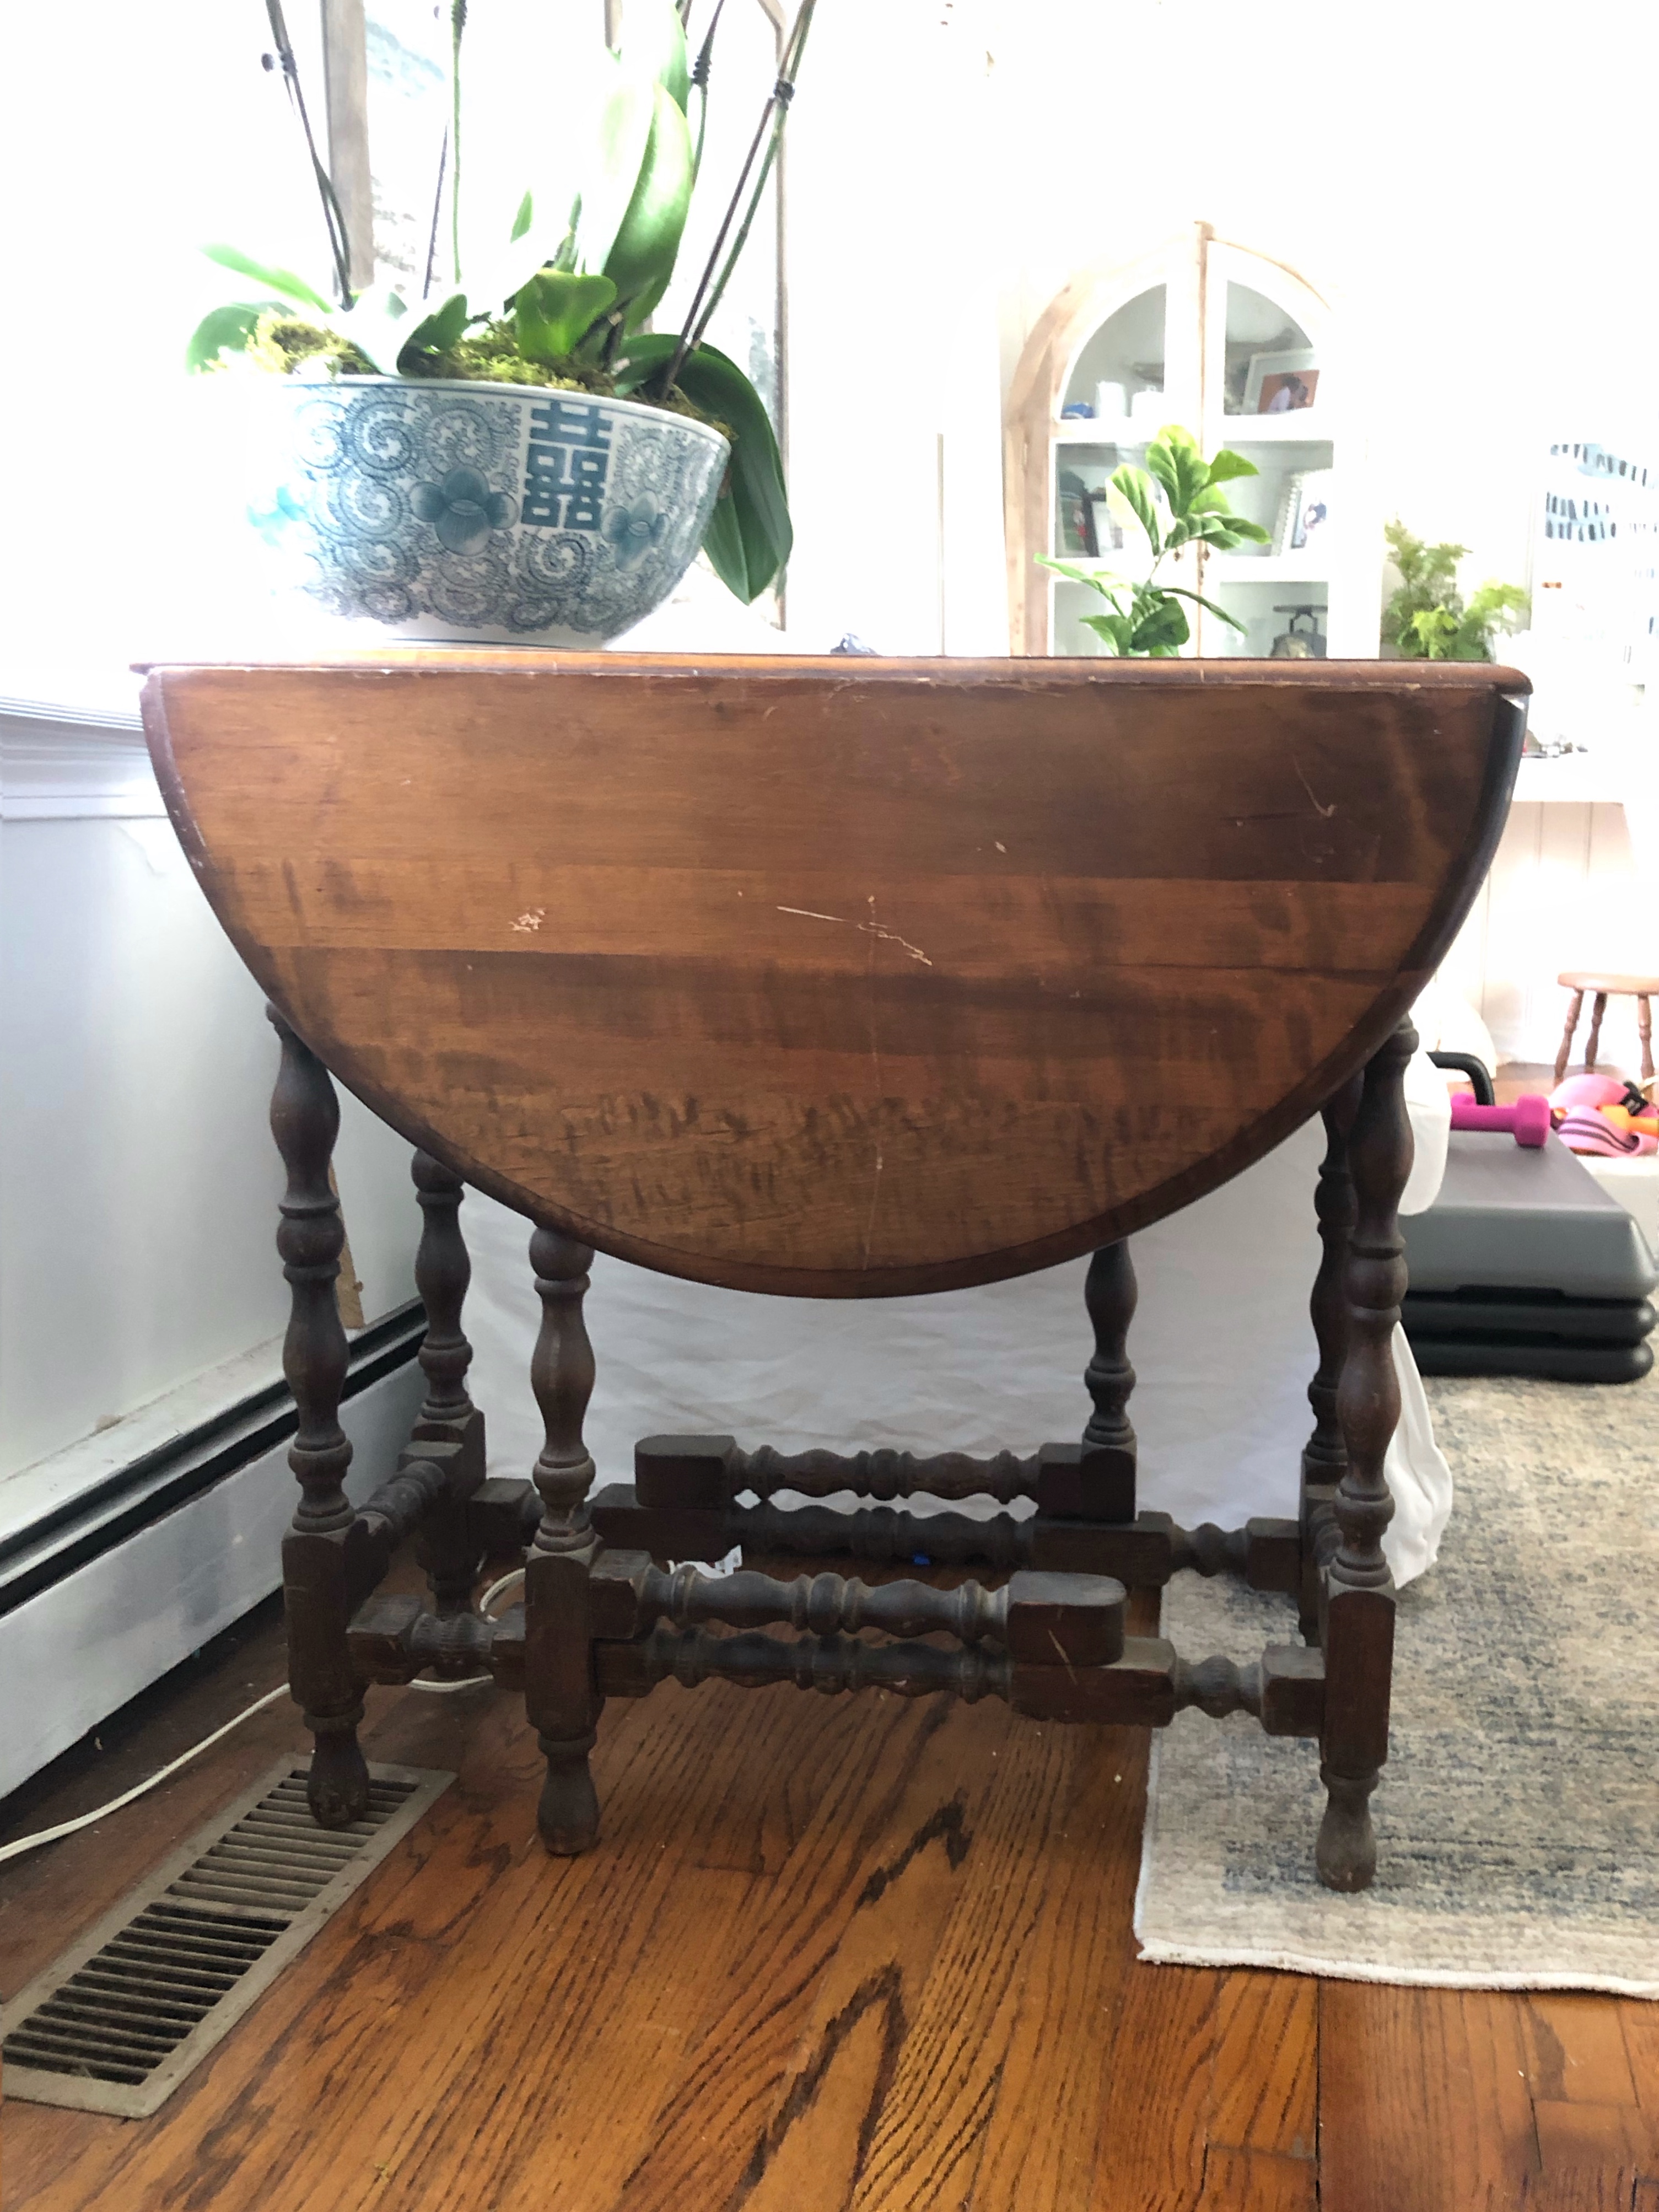
This antique gateleg table was a piece that sat in my grandparents home until the day my grandfather decided to sell. I can still see to this day where it sat at the top of the stairs with a small little lamp on top. In those days the dark stain was what everyone had, however for me the dark is just not my style.
I broke out my tried and true friends; my sander, Citristrip, after wash, my new friend the AB Bleach combo, white paint and the trusty liming wax!


With any piece I have done in the past, I always start by sanding the flat areas first, it just gives you a better sense of what you are working with. I tend to start sanding with a higher grit usually I will take an 80 or a 100 grit paper to the piece, just to make sure I don’t do any damage to the top.

Once I have a better understanding of the wood and the amount of stain or paint I will adjust the grit level of the paper.
Remember, the lower the grit ( 40, 60, 80) means the coarser the paper.
I decided to use a 60 grit paper on the flat areas of this table, it did a great job with removing the stain, and truthfully it didn’t take long to work over the whole piece.
When these areas were sanded, I took to my Citristrip. I used this when I sanded down striped my Arch hutch, and I have had great success with it in the past. I always make sure to use an old paint brush and I usually just pour it into an old container.


To apply it, I add a good amount to the areas I want to strip off. I work in sections and cover each one with plastic wrap, as you really want to avoid the citristrip drying out. If it dries out it is really tough to get it off.
I normally let the citristrip sit on the piece for a good 45 mins or so, checking it every so often to make sure the different areas are not drying out. If they seem to be dry, I have added more of the citristrip in the past.
Once the time is up, I again work in sections, removing the plastic wrap and scrapping each section to remove the excess stripper. You don’t have to be perfect in removing every last bit, as you can then take a hard bristle brush and scrub it clean with Klean Strip After Wash.

I have to say, the after wash product is a must have when doing any kind of stripping project. It really does a great job in removing the excess stripper that is left on a piece, and can also remove some of the stain.
At this point, you either are ready to move onto the bleaching or if you are not completely happy with how your piece looks you can always go back and repeat the stripping steps again.
If you are ready to move onto the bleaching step awesome!
Here is a before picture of the table prior to applying any of the bleach solution.
For this piece I tried something new (well new to me), the AB bleach process.
The first step is to take A, which I believe is more of a bleach type of solution, and rub it all over your piece using an old rag. You allow this to sit on the piece for 5-10 minutes.

After the allotted time, you apply step B, I used a different rag than I did with step A. I highly recommend wearing gloves at these steps, especially for step B as the mixture gets very hot when combined together.

I let my table sit in the sun, and it lightened up so much faster than my previous experience with using straight bleach.
I believe Step B is a hydrogen peroxide type solution, so that definitely enhanced the reaction and sped up the lightening process. I actually repeated this process for my table, so ultimately doing two rounds of the AB bleach.
Here is the table after the bleaching process, I did a side by side of the pre and post so you can see the difference.


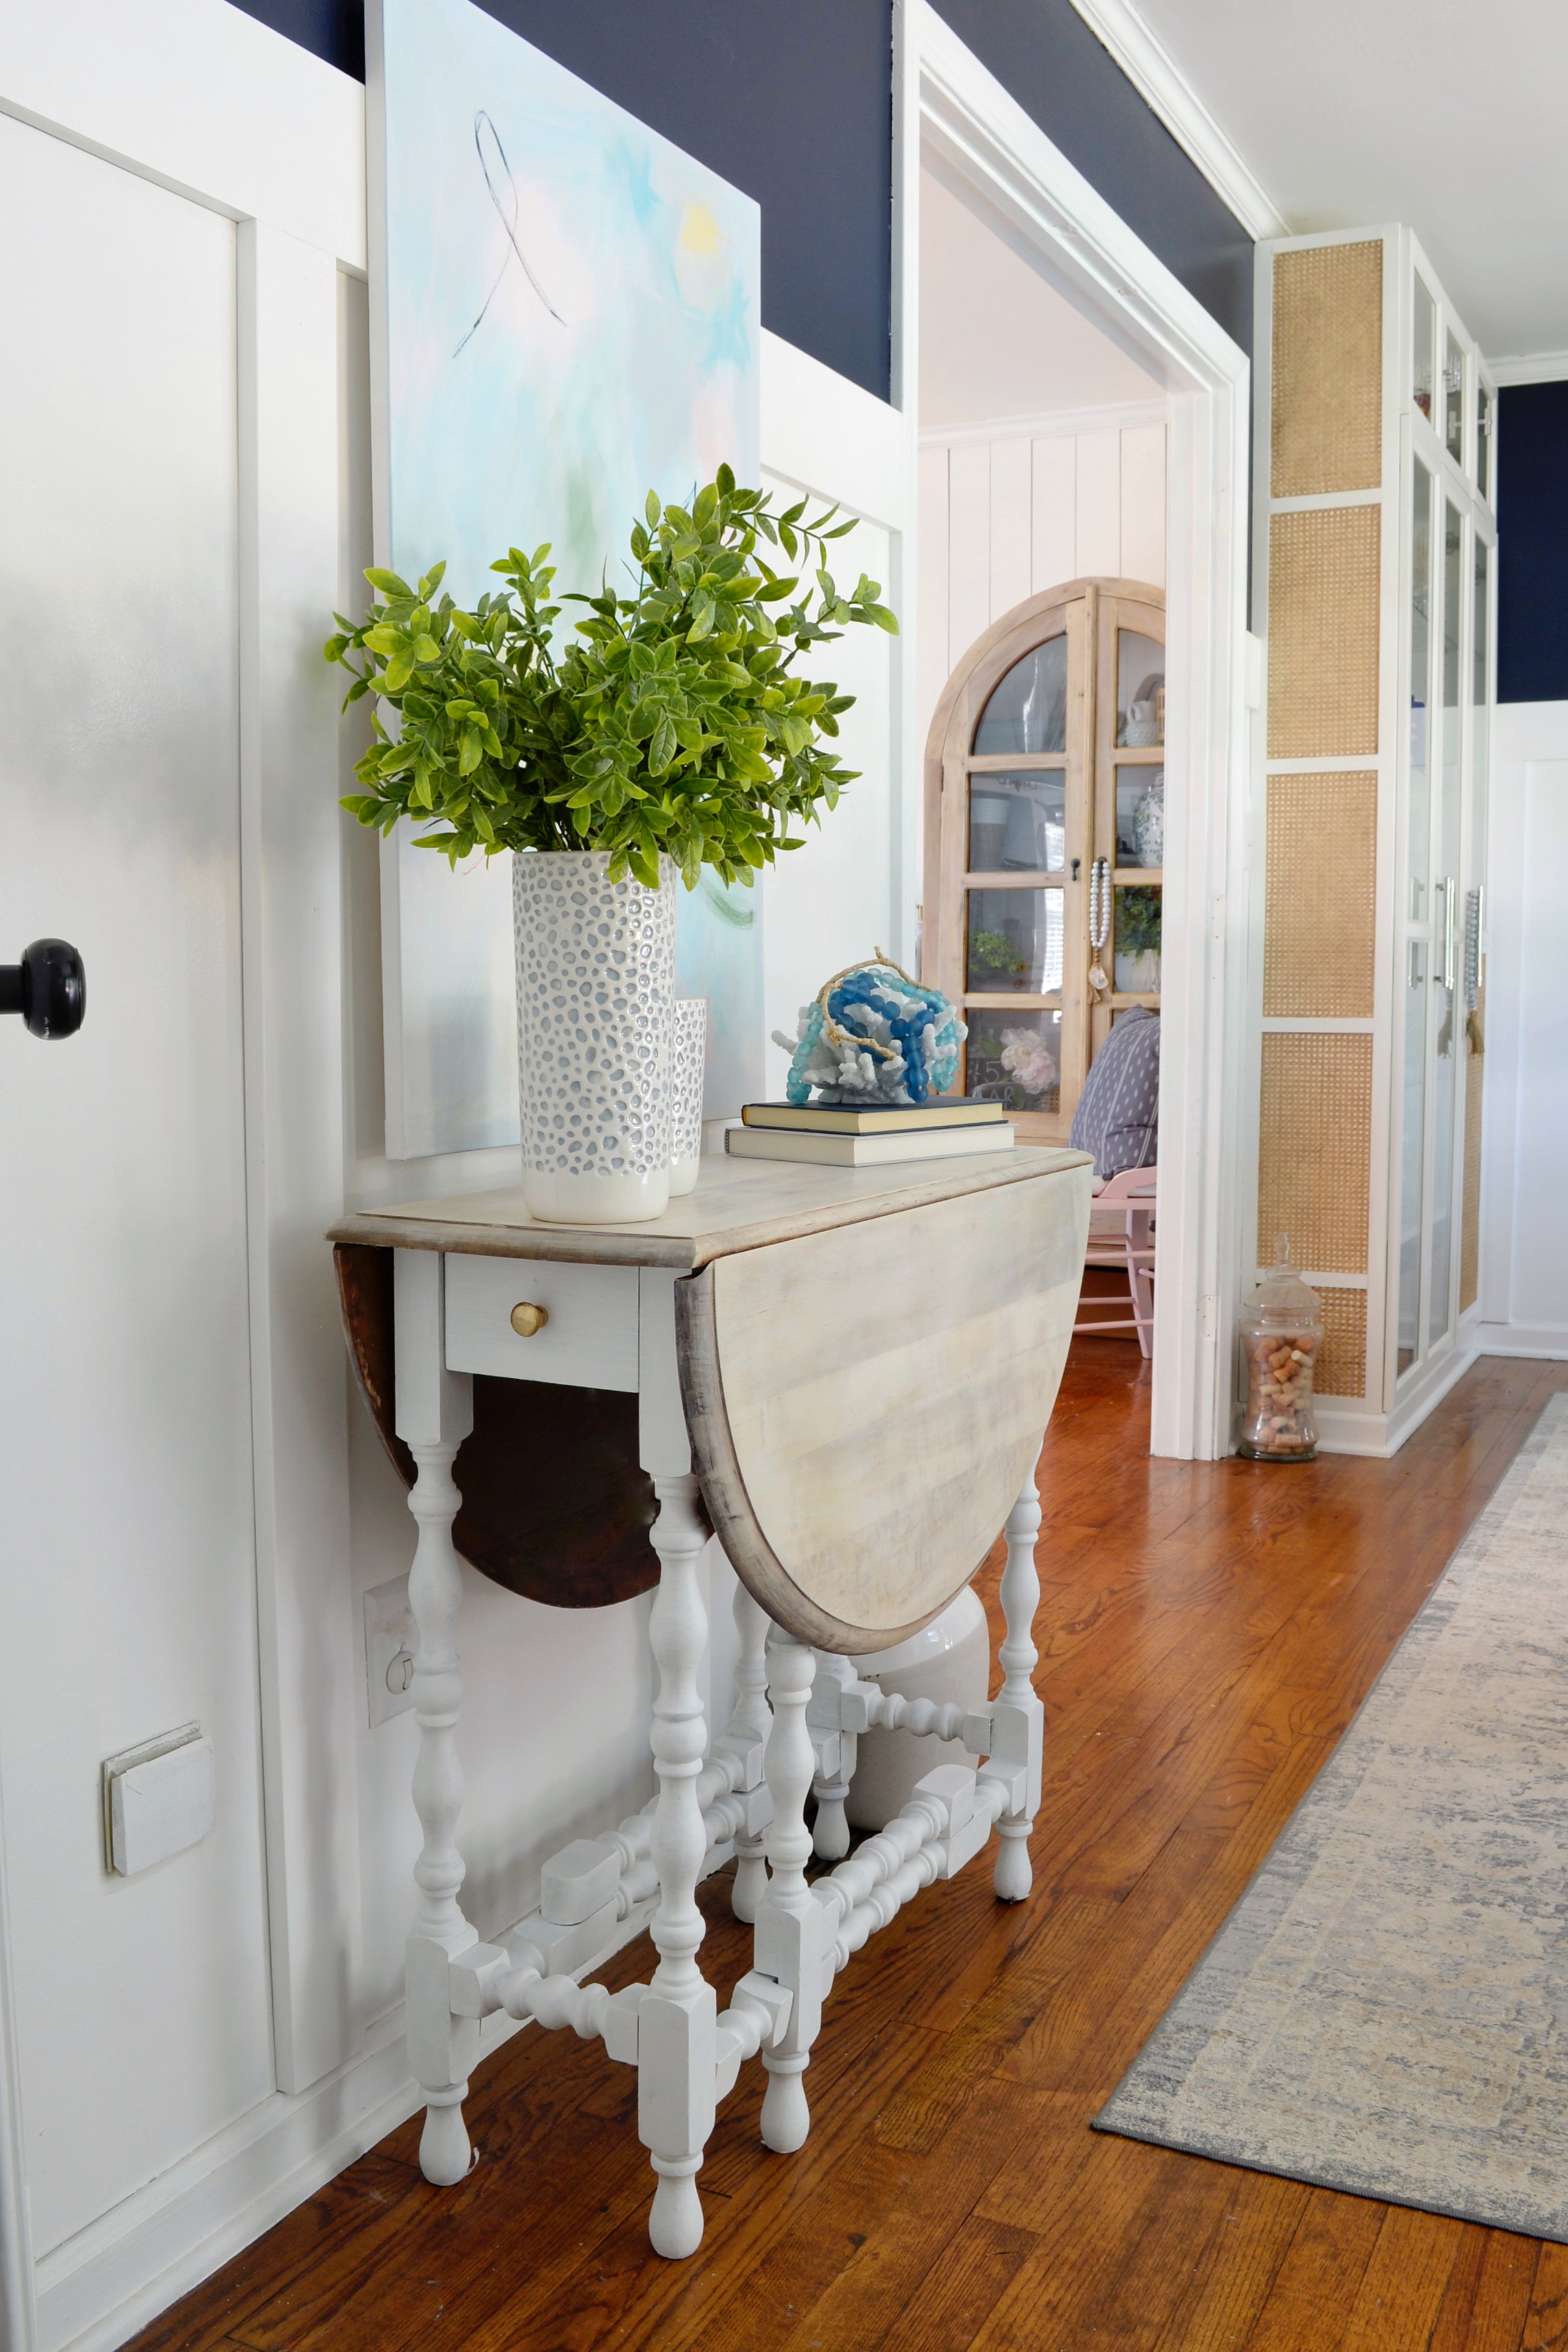
Since the table still had some darker spots along the edges (I could have done better about removing the residual stain, but ahh that’s okay), I decided to do a thin layer of liming wax over the piece.
This gives a subtle white wash look, and tones down some of the yellow in the table. As you can see below, the left side I had already applied the wax and compared to the right you can see the yellow is much less apparent.

Even though I am talking about this after the whole sanding/bleaching process, I actually primed the legs after I did the stripping of the table. It was just when I chose to do it, you can paint or strip at any point you want to!
I decided to paint the legs as I wanted a contrast from the raw wood top. I also really didn’t want to strip all those spindle legs, as I knew that would have been a TREMENDOUS amount of work.
I primed the legs using the Zinsser Bin primer, this product is amazing. I have used it several times in the past and I’ve always had great success, and never an issue with peeling or chipping. The best part about the product is that you DONT HAVE TO SAND PRIOR TO USING, woohoooo!
I know there are other methods and ways to paint these kind of detailed legs, however I used a regular brush. I didn’t have the time (and frankly the energy) to cart my three kiddos to the store to buy a staining sponge. So I sucked it up and painted it the basic way, hahahaha.

After the primer step, I went ahead and painted it using the Sherwin Williams Cashmere line in a semi gloss, extra white. Basically because that is what I had on hand and I really love that true bright white!
To seal the top, you can use a clear wax over top. I still need to complete that step, I am the President of the 5% club, in case you weren’t already aware, hahahaha. I’ll get it done prior to the next time we use it for entertaining!
But here it is! I am so so proud of it, and happy that I was able to breathe new life into such a sentimental piece. Can you believe this is the same piece? Its so special to be able to have these family pieces in my home, and to be able to give them a modern/updated look!


I hope you found this helpful! Please Pin this to your boards on Pinterest and let me know if you have any questions!
xo,
Ashley
2